It has been quite a while since I posted my last blog. I have been busy with school projects and presentations. Finally I got some time to write this new blog. Anyway, today I am writing on how I usually retouch skin in the post process. It might not be the best technique out there. But at least it does help to make you look better :)
Here is an example how to do this. My friend is very kind to let me put her picture here as an example. Thanks very much! (For sure nobody wants to see my face here :p)
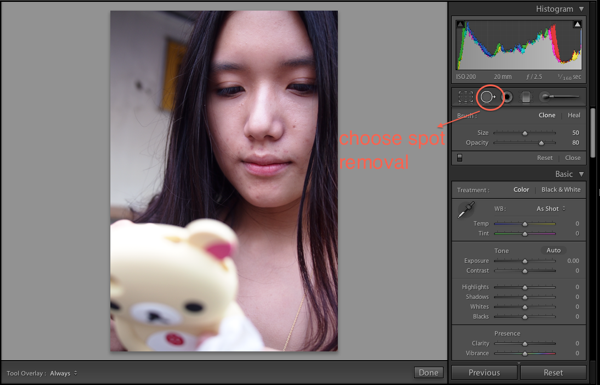
↑First step is to open your Lightroom and go to the picture you want to edit and click "Develop" to bring you to the interface. As you can see, there are a few skin imperfections and our goal is to try to minimize or remove those. So first click the spot removal tool. You could adjust the size of the tool and its opacity. It's very much like the clone tool in Photoshop, so do not use the tool of too big size as the outcome may not be very smooth.
↑Here is how it works. When you click on the skin, it will automatically find something similar in terms of color to replace the original area. That's how we cover the imperfections. Sometimes the software is not smart enough to pick a good cloned area, you can also drag the small circle to the part you want to replace with.
↑That's how it looks after the spot removal is done. You probably notice that it is not very smooth. That's what we are gonna deal with next.
↑Choose brush tool and under the effect, select the preset "soften skin". You can adjust the size of the brush as well. If you feel the effect is not strong enough, adjust the flow higher. When applying the brush on the face, remember NOT to touch on eyes, eyebrows and lips (pretty much like how you wash your face ;))
↑After retouching using the brush, it looks better now.
↑Since the white balance is a bit off (too reddish), use the auto white balance to fix that.
↑Under the noise reduction, slide the luminance to 16. The purpose of this is to slightly blur the whole picture. So do not adjust it too high as it deteriorate the image quality. Now the skin tone looks better. However, the lips appear somewhat pale.
↑Again, choose the brush tool and this time, select the preset "saturation", under the amount, adjust the slider to 30. Then apply the brush on the lips.
↑Okay, this is the final outcome.
↑You can compare how it looks before and after.
Lastly, I want to say that usually in real life, these small imperfections are not so obvious as nobody stares at your face but they do stand out when they show in the photo. So I would not say this is the way of how you can 'cheat'. Instead, just like the purpose of make-up, nobody is in his/her perfect condition for ever, some small little tricks are to help rescue that. After all, everyone wants a perfect memory in the photos, isn't it?
Hope you guys enjoy this tutorial and you can apply this to your work as well. Good night!
Technorati Tags: Lightroom, Photography, Tutorial


that's cheating :-D
ReplyDeleteNo it's not. :p
Deleteone view one dollar.
ReplyDeletelol. You are just too kind to ask for that!
Delete