Pages

Showing posts with label Photography. Show all posts

Tuesday, May 5, 2015

My Choice for Travel Landscape Photography - Sony A6000 with 10-18mm F4 OSS

It must be really a long time since my last update (actually, more than a year!). i’ve been very busy with work schedule so the site didn’t get very maintained with updates.

I didn’t have much time for photography, neither. So I was pretty much satisfied with Sony RX1’s performance for my daily use despite the temptation of the later generation of A7 series. However, I just got something new last weekend. As you can tell, instead of getting the trendy A7 mark II or A7S. I got myself a Sony A6000 body and an ultra wide angle lens, 10-18mm F4 OSS.

The reason that I need a new camera is simple - I am travelling! The destination this time is Turkey - a fantastic place combining west and east, european and asian. It’s famous for its cultural heritage and one of its most important highlights is the architecture. The churches and mosques are so grand and one of a kind. I certainly want to capture the best of them when I am there. An UWA lens will definitely help serve this purpose.

I am an advocate for travel light. Any extra weight to carry will kill the appetite of shooting pictures. So DSLR for sure, is out of my options. For smaller compact cameras, we’ve got recently launched Panasonic LX100, and Sony’s best-selling RX100 Mark III. They both received many positive responses and do have small bodies. However, both cameras have lens integrated and its widest is at 24mm (35mm equivalent). That is not wide enough for the landscape or buildings in Turkey, as I read through some travel blogs. Sony A7 Mark II and its latest 16-35mm FE mount look like the perfect fit. However, it costs a small fortune and out of my budget range (both camera and lens are SGD 2,000 plus each so it ends up being more than SGD 4,000 in total). That’s why I settled at my final choice - A6000 with lens 10-18mm F4 OSS.

I’ve reviewed the lens 10-18mm before. I was impressed with its performance even back then. And 10mm is probably the widest for APS-C cameras (9mm will be fish eyes) I have seen. A6000 receives quite good reviews from many users. No doubt, it was designed and built based on Sony's abundant experience and knowledge of its predecessors - NEX series. This camera was approaching the end of product cycle so I managed to get some good bargain as well.

Here are some usual unboxing photos..


DSC03032

As always, the orange colour for Sony alpha series.

DSC03033

Sony A6000 body, kind of a shame not having the hot shoe cover.. How much does that cost?

DSC03037

The rear side. I like the built-in electronic viewfinder. It’s pretty bright and clear, and doesn’t have any lag issues.
 DSC03039

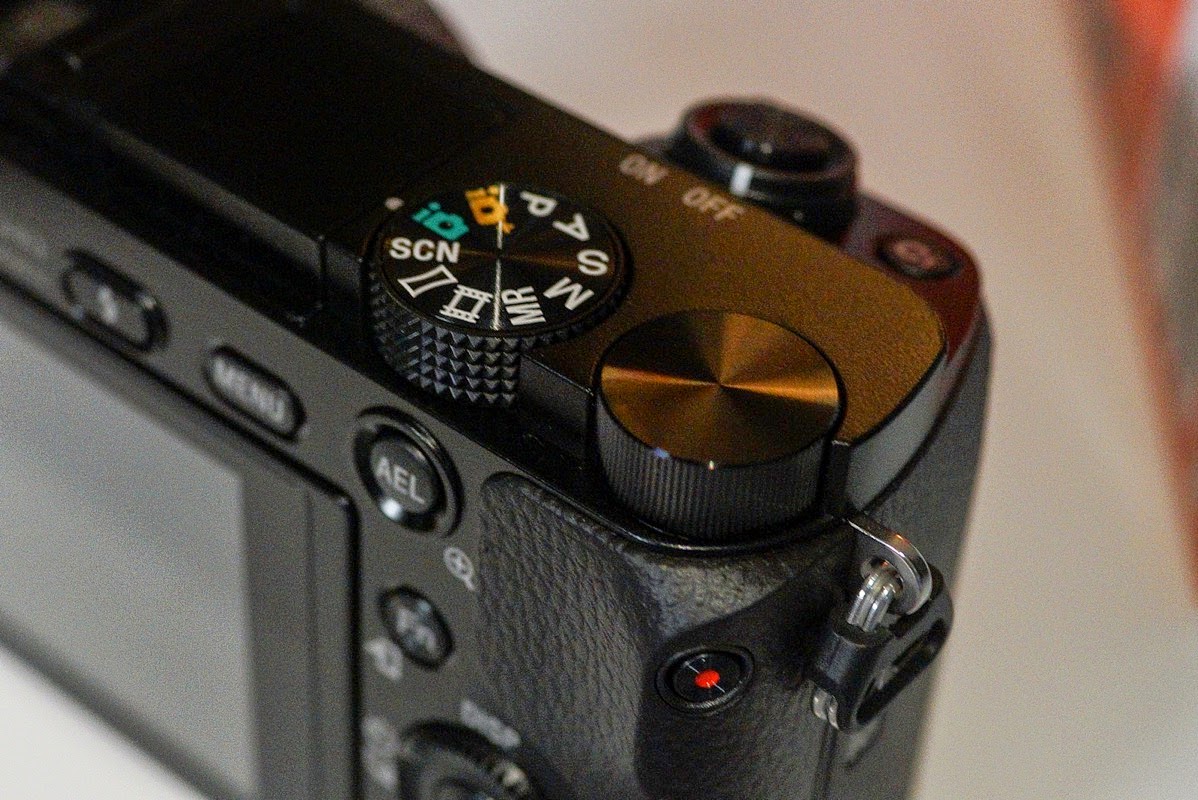
The dials are well made, which reminds of previous NEX-7. The second dial is also customisable. 

DSC03041

The screen can be tilted 90 degree upwards. Too bad it can’t flip 180 degrees for selfies. But you probably expected that since there is a viewfinder in the way.

DSC03043

And here is the 10-18mm F4 lens.. Relatively large size compared to its E-mount peers.

DSC03044

It has built-in OSS, somewhat compensating the lack of large aperture. 

DSC03045

The body and lens assembled. It’s not very compact, but likely the smallest I can get for such wide angle.

DSC03049

The top view, indeed the 10-18mm is a bulk head.

Unnamed


I haven’t really got much chance of taking pictures with the new gears yet. Below is just a picture to show how wide the lens is at 10mm.. (I took the photo right in front of the table). I shall give more hands-on experience when I’m on the road.

DSC00002 3

DSC00008


Sunday, March 16, 2014

Electronic View Finder FDAEV1MK - The Must-Have Accessory for Your Sony RX1/RX1R

I have owned my RX1 for more than a year and I have been enjoying its superb image quality and portable size. However, I still somewhat miss my old days of DSLR while I could the camera near my eye and frame the picture in the view finder. It is not just about the professional feeling (well, it certainly helps me feel better!), it also helps stablize the camera and view the framing in direct sunlight. 

Sony has provided RX1 two options for view finder, first is the Zeiss optical view finder and the other is its electronic view finder. Zeiss view finder is nothing but a piece of glass with no other information supplied, and it’s priced at such a high premium (SGD 800+!!!). People with some sanity would choose the latter one. The electronic view finder, called FDAEV1MK, is so much more powerful and cheaper as well.

Well, when I say cheaper, it is not that cheap if you look at the absolute value (that’s probably true to most of Sony accessories..). But let’s admit that’s the only option I have for RX1. In Singapore, it’s priced at SGD 629. You are able to get a good point-n-shoot camera with that much of money. So I ordered this overseas from Amazon Japan and got my friend to bring it back. Thanks to the weaker yen and Japanese domestic pricing, I only spent about 400 SGD on this view finder, which is indeed a good deal.

Ok, let’s first start with the usual unboxing..

  DSC00300

The package comes with the viewfinder itself, a smaller eyecup for change, a leather case and a piece of wiping cloth.

DSC00301

A close up of the view finder.

DSC00306

Made in Japan.

DSC00308

The viewfinder with the smaller eyecup on.

2014 02 26 22 26 55

The view finder and RX1! Looks really cool.

2014 02 26 22 31 52 1

And of course it can be adjusted to different angles, up till 90 degrees, and suits different shooting situations.  

2014 02 26 22 32 46 1

This is what you see through the viewfinder. It displays the same information you could see from the panel screen. You can even switch to settings, playback pictures, etc.

In the camera settings, you can set the viewfinder as auto on/off. So when your eyes are close enough, it automatically switches on the view finder and turns off when eyes are away. That’s very convenient for shooting and viewing. 

I’ve tried both eyecups and personally I feel the bigger eyecup suits me better. My nose touches the screen if I’m using the smaller eyecup which caused some discomfort. It’s probably better for people wearing glasses. 

So here is my conclusion of this electronic view finder:

1. It’s very well made and the image is bright, sharp and clear, the lag is very minimal.

2. It helps shooting and viewing under direct sunlight and it greatly reduces the shake when pressing the shutter.

3. The only drawback I found: there is no lock for the viewfinder. So I always have the worry that it will come off if I’m walking and it’s hanging around my body. But frankly speaking, the port is pretty tight and I don’t think it will come off that easily.

Thanks for the reading and enjoy your weekend!

Technorati Tags: , , ,

Friday, August 2, 2013

Unveiling RX100II in Singapore: Exclusive Preview Session with Sony!

Sony's RX100 has gained a lot of popularity among camera users. It has been enjoyed by both groups: amateurs and professionals.  I believe that's because it is a right combination of the size and the photo quality. And now the camera just gets even better. Its successor RX100II is launched in Singapore. I was invited to the RX100II preview session with Sony tonight. 

It's quite an exclusive session with about 20 guests and a number of Sony staff on the site. The venue is a cosy and nice café called 'Symmetry'.  It is beautifully decorated and RX100II and accessories were on display. 

DSC07894

DSC07893

DSC07917

DSC07916


Introduction of RX100II

The session started with an introduction to the upgraded RX100II. The highlights in the new model include better low light performance, tillable screen, multi-purpose hot shoe and NFC and WiFi connectivity.  

DSC07898

DSC07899


Shooting Session

It was then followed by a hands-on session where we were given test machines to walk around and shoot night scene in one of the streets around the café.

DSC07910

I got one test unit with me and yes it feels great in hand! 

I didn't use RX100 before and had very limited time spent with RX100II. So just a few brief thoughts first:

1. Camera body is well built and solid. It is small but not too small that you can't hold it properly.

2. Camera starts up pretty quickly, within 2 seconds I think

3. The settings can be easily navigated (or maybe because I'm a current user of NEX-5n and RX1?). But I still prefer a physical zoom ring over an electronic one..

4. Glad to see that finally the photo ratio could be 1:1 and 4:3! In NEX-5N there are only 3:2 and 16:9 available :(

5. Blur will still be expected if you shoot photos at telezoom end in a low light condition. 

6. I have not yet tested out the WiFi and NFC sharing features, but I can see that will bring a lot of new use in the daily shooting!

Here are some of shots I took with RX100II.

DSC09996

DSC00002

DSC00004

DSC00009

DSC09998


Food

Besides the shooting session, one of the highlights in tonight's event is food!  So many of them and I didn't get a chance to take pictures for them all. So below are some good delights. :p

DSC07903

DSC07906

DSC07908

DSC07922

DSC07920

According to Sony, RX100II will be in Singapore's stores 'in a few days'. Hopefully I'll get a test unit with more thorough review pretty soon! So stay tuned if you would like to get to know more about this camera! 

Technorati Tags: , , , ,

Sunday, June 23, 2013

Fresh New Look for Flickr!

I complained about Flickr last time when I was writing about 500px. I was not very happy with its old, clumsy UI and not motivated at all to upload new photos. Luckily, Flickr seems to have realized this as well. After a major revamp of the UI and free 1TB storage for everybody, it looks all new again!

Screen Shot 2012 12 12 at 9 31 52 PM

Screen Shot 2013 06 23 at 10 41 55 AM

The before and after screenshots well explained the change. Photos are now nicely displayed by fitting in place rather than piece by piece. It also introduces the concept of cover photo, like many other social websites and a high resolution profile picture. 

Screen Shot 2013 06 23 at 10 49 16 AM

In the Homepage, contacts' activities are more 'photo-oriented', and it's easier to find photos that one will be interested in.

Screen Shot 2013 06 23 at 10 50 55 AM

The Uploadr also seems better tweaked. Now Flickr offers 1TB free storage space and original images to all its users. In the Uploadr it indicates that how much you have used of the 1TB storage. Not sure how the previous paid users feel about this upgrade? However, it is definitely some change that is welcomed by the majority of Flickr community.

I feel more motivated to upload my photos to Flickr after the change. Of course, it still has its shortcomings, for example, I can't change the layout of the photostream. I want to reduce the photo size to display more photos in one screen.  It also only has the option to add photos to favourite but not simply 'like' it, which makes the social feature less interactive. 

Anyway, Flickr has done the right thing. People must feel more encouraged to upload their photos to Flickr now (at least I do). So do check it out if you haven't come back to Flickr for long! 

You can check out my Flickr site here :)

Technorati Tags: , ,

Saturday, June 15, 2013

Adobe Lightroom 5 Official Version! Three New Features That You Must Try

Screen Shot 2013 06 15 at 10 38 02 PM

As mentioned in my previous post, I was excited about the new upgrade of Adobe Lightroom. At that time Lightroom 5 is only a beta version so that it is not compatible with the Lightroom 4 catalog file. Now finally Adobe puts its official release on its website. What's more, anybody with an Adobe account can enjoy up to 30 days free trial! So if you are not so sure whether Lightroom 5 is the right tool for you, always download the trial version to find out more!

Over the upgrade, the greatest concern is that whether it offers faster processing speed that Lightroom 4. Lightroom 4 is REALLY sluggish, much slower than Lightroom 3, regardless of your hardware specification. A couple of my friends tried out the Lightroom 5 and said it's much faster than its predecessor. However, I don't have the same experience as them. I find it marginally faster than before. It could be because that I am running it on MacBook Air that I bought almost three years ago (Core 2 Duo!). So I would assume anybody has a current mainstream computer would enjoy the improvement.

Lightroom 5 offers a bunch of new features. Besides some of the small add-ons like video slide show, location-based organisation. There are three features I think are worth introducing in this post. This will greatly enhance the post-process of your photos.

Radial Gradient

First is the radial gradient. Previous generations of Lightroom only offers linear gradient functions. It has been a great function in editing. The addition of radial gradient makes this even more useful. 

Screen Shot 2013 06 15 at 6 27 27 PM

Changing the saturation to negative, it can make the subject stand out

Screen Shot 2013 06 15 at 6 33 42 PM

Adjusting the exposure to negative, the subject in the centre of the radial filter will be standing out (thought that could be achieved using vignette effect).

Upright

The second feature is Upright. Lightroom 5 will auto-analyse the picture and adjust to the upright perspective. It is extremely useful for landscape and building photos since many times we may not have photo at perfect level or vertically it is not in the same plate.  Below are some examples how this function can help solve the problem

Screen Shot 2013 06 13 at 7 47 17 PM

I took this photo around Chinatown, Singapore and you can see that the photo was taken from lower perspective (I am not tall enough! :( ). After the adjustment, the photo looks like as if it were taken from the same level.

Screen Shot 2013 06 14 at 10 42 37 PM

This was taken in front of the Grand Place in Cambodia, I was trying to capture the flying pigeons so I didn't notice my photo is tilted. After the Upright adjustment, it loos much better. It may seem only some rotation is done, but if you take a closer look, you can see the road line is straightened as well. 

Advanced Healing Brush

The last one is powerful! If you have used Photoshop before, you'll be amazed how its healing brush works. It can smartly remove the subject and keep the background clean as if it never existed. And this advanced healing brush has come to Lightroom 5! You are empowered!

Screen Shot 2013 06 15 at 6 43 01 PM

In the photo above it is actually good to have some figure in the foreground, so here is just an illustration of how it works. All you have to do is to apply the healing brush on the subject and it will be replaced by the similar background! Isn't this great? though you may need to try a few times to get the best result.

This is what I have got with Lightroom 5 so far. For sure there are many more to explore and I will share with you guys when I find out that. Also please let me know in the comment if you have tried out Lightroom 5 and found any interesting bits.

Technorati Tags: , , ,

Wednesday, March 27, 2013

Guest Blog: Nikon Full Frame DSLR D600 Review: Part II

By TJ Xie

It’s been more than three weeks since I got my D600. I have been trying to explore its potential as much as I can. Lenses I use are 50mm f/1.8G, 85mm f/1.8G, 105mm f/2.8G Micro and Voigtlander 28mm f/2.8.

In this part of review, I will talk about the high ISO performance and show some sample pictures.

Before we start, here’s a summary of my experience with D600:

1. Auto ISO setting is fantastic

2. Higher shutter speed is needed to obtain sharp images

High ISO performance

High ISO performance does not rely solely on the camera itself. Instead, the lighting condition under which photos are taken matters more. In other words, under a low-light condition, photos contains more noise than those taken in bright lighting. As such, I thought a favourable place to test out the high ISO performance would probably be a museum where lights are dimmed. Then, I decided to visit the ArtScience Museum. There is an ongoing Lego exhibition named “Art of the Bricks”.

A bit of sidetrack on my camera’s settings. I set my camera to auto-ISO mode so that in aperture priority mode, the ISO value increases automatically when I need a slower shutter than a minimum speed of my choice. A nice feature I found on D600 is that the camera is able to set a minimum shutter speed automatically. By default, the minimum shutter speed is set to the reciprocal of the focal length of the lens. For example, if I mounted a 50mm lens on the camera, the minimum shutter speed would be 1/50s. If I change the lens to a 85mm, the minimum shutter speed changes to 1/100 accordingly. In the past, I often forgot to change the minimum shutter speed when I changed a lens. This feature solves my problem.

As expected, the lighting was poor in the museum. Many of the shots turn out to have high ISO values. Here are some pictures with high ISO values:

ISO 1600

NewImage

http://tjxie.smugmug.com/photos/i-LDTrvRR/0/X3/i-LDTrvRR-X3.jpg

ISO 3200

NewImage

http://tjxie.smugmug.com/photos/i-cTWDGbd/0/X3/i-cTWDGbd-X3.jpg

ISO 4000

NewImage

http://tjxie.smugmug.com/photos/i-WBHCdj5/0/X3/i-WBHCdj5-X3.jpg

The noise level is not visible by 3200. To me, even the last picture with ISO 4000 is acceptable. I shoot in RAW, and sharpness is always my priority, so I wouldn’t mind pushing the ISO all the way up to 6400 in order to get sharp images. And I will leave noise reduction work to my computer

Macro and walkabout

On the other day, I went for a walk in Singapore Botanic Gardens. The shots are mainly macro and walkabout photos.
For macro photos, because of the long focal length of 105mm, I was forced to use apertures smaller than f/8 to ensure sufficient depth of field. As I have described in Part I of the review, when the aperture gets smaller, the dust/oil spots becomes more obvious on the photo. However, since I’ve bought the camera, other than waiting for a solution from Nikon, I would rather find out my own solution. After a few clicks with the auto-retouch tool in Capture NX 2, the spots are not visible anymore. Here are some sample pictures for you to enjoy.

NewImage

NewImage

NewImage

NewImage 


Issue

One annoying issue I have with D600 is that, when I set the camera to auto-ISO mode with the default minimum shutter speed, it appears that this shutter speed is not fast enough to prevent hand movements. This is not strange because with such a high resolution, small movements are likely to get exaggerated when the photos are zoomed in to 100%.

Again, I need my own solution. I would set the minimum shutter speed one stop faster in the outdoors or when the lighting condition is good, i.e, 1/100s for a 50mm lens. Thanks to the good high ISO perfornace, I have the luxury for the ISO value to automatically increase by one stop to compensate the exposure. Photos are now less prone to hand movements with the faster shutter speed.

Verdict

It’s a great camera. I’ve not used D800 or D4, but for SGD2400, I thought I've got a good camera. I like it when my 85mm portrait lens is no longer so tight during framing, and when my 28mm Voigtlander is literally a wide angle lens now. The ISO performance is also a lot better than my previous D90. The only issue would be the occassional blurry images caused by the high resolution, but it can be avoided by using higher shutter speed.

Some people are still concerned about the dust/oil spot issue. My suggestion would be that if you mainly shoot portraits or landscapes which don't require a small aperture (if you understand hyperfocal distance, an aperture smaller than f/8 does't give you much more depth of field on a wide angle lens), this issue would be a non issue. The only scenario where this issue matters would be the macro photography. However, it can be solved easily.

Technorati Tags: , , , , ,