It has been long since I last posted a Lightroom tutorial on how to retouch skin using Lightroom. I must say that I am no way near a pro-photographer, or advanced user in post processing. I only use a few basic techniques to fine tune my photos. And today I am sharing one of my very often used techniques: how to create Japanese-style photos.
What's Japanese-style photo? It is not something clearly defined. This photography style originated from Japan and is most popular in Asian area. In general, the photo colours are light and undersaturated. The picture is somewhat over-exposed and slightly out of focus. Compared to normal photography, it demands fewer rules and techniques. The photos create a soft and light-hearted feeling. Some good examples can be seen below.
So next, how can we render and produce pictures like this? It may require both pre-processing and post processing work.
Film camera usually gives you this Japanese picture effect without much post-process due to its higher dynamic range and unique colour rendering. However, not many of us possess a film camera and it's also a hassle to go through developing the films and scan the pictures. However, using the digital cameras we can still achieve the same purpose. It just needs more effort on the post-processing side.
Above is a sample picture I am using for this tutorial. Here is the outcome. Next I'll show a step-by-step instruction on how to achieve this photo style using Adobe Lightroom 4.
Let's start from the very original picture.. It was actually taken a year back. The camera I used is NEX-5N and its kit lens, 18-55mm. The model's face is a bit dark and harsh as it is backlighting and I didn't use a reflector to compensate that. So the first step is to increase the exposure and soften the face. Click on the brush icon, and set exposure as 0.35, clarity -100 and sharpness 19. Then apply the brush on the face area and try to avoid the eyes.
After that, again using the brush tool, set the clarity to 34 (the rest are 0). Apply the brush on the eyes. This step is to make the eyes more outstanding and 'in focus'.
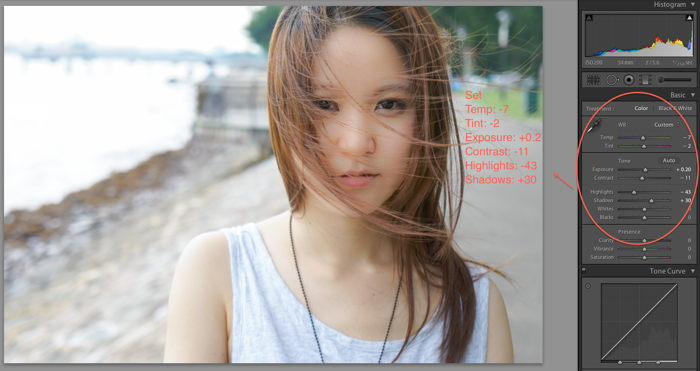
Then it's about fine tuning the white balance and tone. Set temp as -7, tint -2, exposure +0.2, contrast -11, highlights -43, and shadows +30. The general principle of this step is that make the white balance neutral or slightly blueish, increase the exposure and lower the contrast so that it looks more natural.
Next, as you may notice that the background on the left is a bit distracting, it needs to be made blurry. Click on the Graduated Filter, and set the Exposure to 0.3 and Clarity -100. Then drag the filter from left to the model's shoulder. You can see a noticeable difference after the filter applied.
Last step is to add a little bit blue to the picture. In the Split Toning section, Under Shadows, set Hue as 223 and Saturation as 15. It gives the picture some resemblance of film photos.
Here is the before-after comparison.
Lastly, special thanks to Shirley for being the model! Hope everyone find the tutorial useful and have a great Sunday today! :D
Other Lightroom tutorials you may be interested in:
Make Your Photos Movie-like/Vintage! - Tutorial on Photo Post-processing
Get Your Fair Skin Using Lightroom
Technorati Tags: Photography, Tips, Lightroom Tutorial


Hello sir , I'm new to photography and I found your guides are amazing .
ReplyDeleteI've seen a Japanese in Flickr and his set is simply outstanding too , do you have any idea editing effects like these
Here's his profile links - http://www.flickr.com/photos/hiropiroz/
Hi Hann Jie, I am happy that you like it! Yea, I've just checked out the flickr you mentioned. Indeed it's amazing! I don't there is a one-to-all technique/filter that could do the magic for all the photos he has. Some general principles for Japanese-style photos are:
Delete1) Overexposed so that the photo looks bright and clean.
2) Less saturated colours.
3) A bit of vignette at the corners to make the subject more outstanding.
4) Add some green/blue tint to the whole picture so it looks somewhat film-like.
Let me know if you have any question! :)
Thank you very much for the extreme quick reply !!
ReplyDeleteI'll stick to your site more ! Good day sir !
can you make tutorial for photoshop
ReplyDeleteHi, thank you so much for sharing this guide. I have a friend who is fan of japanese things. I think I'll give her a japanese style photo as birthday present. Tell me please, will this guide work with https://macphun.com/tonality? Because I'm not using Lightroom.
ReplyDelete